While the goal of your invitation form is to maximize the number of invitations generated, the goal of your email templates is to maximize the conversion rate of those invitations. Vortex treats your invitations like a marketing campaign, and like any good campaign you usually need multiple touch points. Instead of just a single invitation email, that may or may not convert, the Templates tab in your invitation flow allows you to create a campaign of emails that include reminders, nudges and acceptance notifcations. You control the number of emails, the cadence, and of course, the styling.Documentation Index
Fetch the complete documentation index at: https://docs.vortexsoftware.com/llms.txt
Use this file to discover all available pages before exploring further.
Settings
- For all email templates, settings include the email subject, From address, From name, and Reply-to address. Note that you’ll need to verify the domain used in your From address (look for Email Domains in the Vortex sidebar) before emails can be sent from your domain. Until the domain is verified, emails will be sent from the jyn.us domain.
- The invitation template allows you to determine whether or not your email invitations expire, and if so, after what period of time. Note that if your flow includes reminder and nudge emails, make sure that they all fall within your expiration window. For example, if invitations expire in 30 days, you’ll want to make sure all reminders and nudges go out before the 30-day expiration.
- The initial reminder and nudge templates allow you to determine how many, if any, reminders and nudges you want to send. Reminders are emails sent to the invitee encouraging them to accept the invitation. Nudges are emails sent to the inviter encouraging them to follow up with the invitee.
- You’ll also be able to determine the cadence for your reminders and nudges. For each reminder and nudge you specify the number of days to wait after the preceding invitation/reminder/nudge before sending the next one. For example, you might wait one day after the initial invitation before sending the first reminder, and then another six days before sending the second reminder. Note that reminders and nudges only get sent if the invitation hasn’t yet been accepted.
- If the invitation expiration window is shortened, the intervals between your reminders and nudges may automatically be adjusted to fit in the new window.
- The acceptance template allows you to enable emails that are sent to the inviter once the invitation has been accepted.
Elements
As with any email you send, you’ll want the look and feel of your invitation emails to be consistent with your brand. Select an element from the dropdown at the top of the Elements tab, or click on an element in the template preview, to control the details of its styling (fonts, colors, borders, spacing, etc.). You can also rearrange the elements in your templates using drag-and-drop. Depending on whether or not you’ve enabled reminders, nudges and acceptances, you could have a number of individual email templates to work with. To simplify the process of getting all templates to look consistent, Vortex allows you to make styling changes that apply to all templates. For most elements you’ll see tabs that allow you to either make changes that will apply to all templates, or just to the given element on the current template. For example, if you are changing the color of the main call-to-action button for accepting an invitation, more than likely you’ll want this to apply to all templates. In fact, most changes will likely fall into this category. But Vortex does allow you to make changes that apply just to the current template when necessary. Click on the selector at the top-right of the display to change from edit mode to preview mode, or to send yourself a sample email.Add Element
The Add Element tab allows you to add additional content, including things like images, buttons and links, to your templates. When you drag an element onto a template, unless you drop it into an empty cell in an existing row, a new row will automatically be created at the spot where you drop the new element.Template Variables
Invitation emails are much more effective when they’re personalized and enriched with dynamic content. Template variables are the mechanism by which you add this content to your templates. Variables can be added to a template simply by entering a variable name of your choosing (letters, numbers, underscores, hyphens and periods are valid) enclosed in double curly brackets. The invitation email depicted in the screenshot below is an example of how we’ve used variables in our own invitation emails.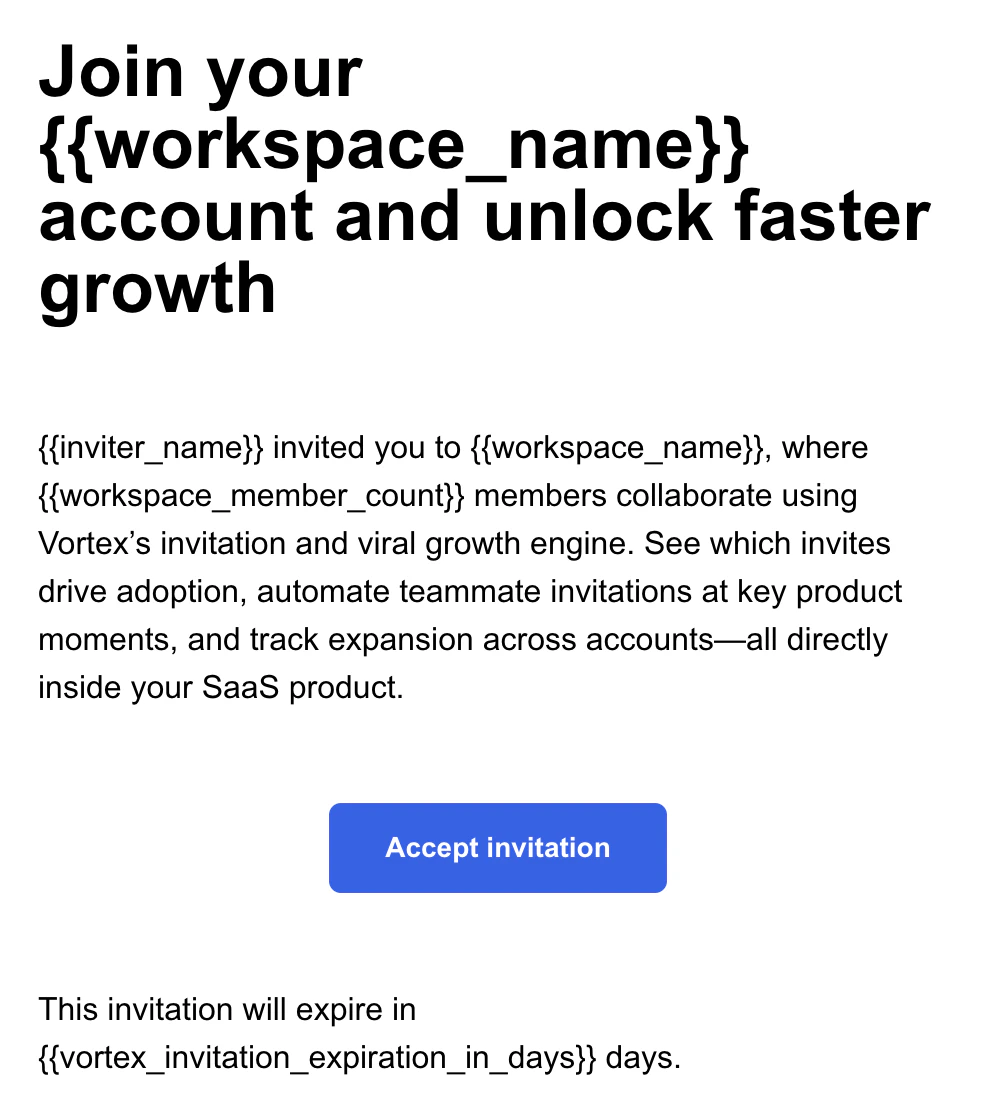
{{workspace_name}}- The name of the workspace the person is being invited to.{{inviter_name}}- The name of the inviter.{{workspace_member_count}}- The number of existing members in the workspace, which gives the invitee a sense of missing out because other people are already in the workspace.
templateVariables parameter in the code snippet used to render the invitation form.
The use of variables isn’t limited to the copy in your emails. You can also use them with in various settings, and in your invitation form as well. Some examples:
- Pass the inviter’s name in on a variable called
{{inviter_name}}and create a From name of “{{inviter_name}}via AcmeTasks” so that your email would come from “Dave Hersh via AcmeTasks”. - Include a variable in your form title to represent the name of the workspace/team/org (e.g., “Invite people to
{{workspace_name}}”). - Use a variable like
{{default_emails}}in the Default Values field in the settings for your email inivtations element to have email addressed pre-filled in the invitation form.
Other sources of variables
Not all variables are populated by customers. If you have any custom fields as part of your invitation form, a variable with the custom field’s element name will automatically be populated with the value from the invitation submission. For example, if you have a custom field that allows the inviter to specify the invitee’s role (e.g., member or admin), and the element name for that field is “role”, you can add a{{role}} variable to a template to create a line of copy along the lines of, “You’ve been invited as an admin.”
There are also some variables provided by Vortex, which are prefixed with “vortex_”, that are automatically populated.
{{vortex_invite_link}}- This is the single-use invitation link that is used in all invitation, reminder and nudge emails. In the above example you can see that it is the action associated with the Join button in the invitation.{{vortex_share_link}}- This is the multi-use shareable invitation link that inviters can distribute on their own, or via integrations included on the invite form, and is used in the link-sharing template.{{vortex_invitee_email}}- The email address of the person being invited.{{vortex_inviter_email}}- The email address of the person who sent the invitation. Can be used in reply-to headers so recipients can respond directly.{{vortex_invitation_expiration_in_days}}- If your invitations expire, this variable represents the number of days remaining (as of the time the email was sent) until expiration. Including this information in invitation and reminder emails is a great way to create a sense of urgency with the invitee.
Conditional logic
Vortex templates support the following condtionals:- equals
- notEquals
- greaterThan
- lessThan
- and
- or
- pluralize
- insert - For example,
{{insert inviter_name “default=your colleague”}}
equals conditional is used to vary things based on the number of workspace members. If there’s just one, we refer that person specifically by name. If there’s more than one, we refer to “N others”.
Now let’s look at the paragraph about the invitation expiration:
pluralize substitution: