Check for invitations during registration
When someone signs up for your service directly, without coming in via an invitation link, it’s still important to check for open invitations to make sure that the user ends up in an existing organization instead of unnecessarily creating a new one. This is a very common problem with B2B SaaS services, especially ones where content can be shared with unregistered people. Let’s use Slack as an example. Say bob@acme.com has been invited to three different Slack workspaces. For whatever reason, Bob doesn’t use any of the invitations he received, and instead goes directly to slack.com to sign up. As soon as his email address has been confirmed, Slack presents Bob with the three workspaces that he can join, as well as an option to create a new workspace. This flow would look something like this:Check for open invitations
Send a GET request to
/invitations with targetType being “email” and targetValue being the email address used at registration. This will return a list of open invitations to the given email address. If there are any organizations that can be joined via autojoin (i.e., based on the email domain) they will also be included in the response.Present invitations to the user (optional)
If any additional invitations were returned, it’s up to you to decide what to do with them based on the nature of your service. In the previous Slack example, the user can select just one workspace to join at a time, which makes sense because each workspace on Slack requires its own set of credentials. For some services, allowing the user to select multiple invitations to accept at once may make sense. And for others, you might want to simply have all open invitations accepted automatically upon registration. For example, if you’re invited to join multiple boards on Trello, when you sign up you’re automatically a member of all of those boards.
Mark the invitation(s) as accepted
If any invitations were presented and accepted, once the user completes the signup process, send a POST request
/invitations/accept with the IDs of the invitations being accepted.Displaying a list of open invitations
You might want to display a list of open invitations on the Members page of a workspace, or in an admin area, of a B2B service, or on a user’s Connections page in a community site. To get a list of all open invitations, send a GET request to/invitations/by-group/{groupType}/{groupId} where groupType is the type of grouping (e.g., workspace, org, etc.) and groupID is its internal ID.
In the list of open invitations you may want to provide the ability to either revoke (i.e., delete) or resend an invitation.
Revoking an invitation
As part of displaying a list of open invitations, as described above, you may want to include a link or button to revoke/delete an invitation. Often this capability is limited to an admin, or possibly the user that generated the invitation. That link should send a DELETE request to the/invitations/{invitationId} endpoint to delete the given invitation.
Resending an invitation
Also as part of displaying a list of open invitations you may want to include a link or button to resend the invitation. Send a POST request to/invitations/{invitationId}/reinvite using the invitationId associated with the invitation being resent.
Invitations to existing users
When you think of invitations you most often think of bringing new people into your service, but there are many instances where invitees are existing users. Take Trello as an example. When inviting people to a project board you can either enter the email address of someone not yet on Trello, or you can select from existing workspace members. You may want to leverage the autocompleteCallback to make it easier to invite existing users, where applicable, but there are different ways you may want to handle those invitations once created.Auto-accept internal invitations
In some cases you may want invitations to existing users to not really be invitations at all. For example, when a member of a Trello workspace gets added to a board there may be no need for that user to take any action. They simply get added to the board. To accomplish this you’ll want to do two things:- Create a webhook so that you get immediately notified when internal invitations are created, so that you can add the user to the appropriate board (or whatever the case might be with your service), and then send a POST request to
/invitations/acceptwith the invitation ID to mark it as accepted. To create a webhook, look for Integrations in the Vortex sidebar and then click on the Webhooks tab. Be sure to select the “Invitation Created” event (at a minimum) and then look for invitations with type “internal” when processing events. - In this auto-accept scenario you probably don’t want these internal invitees to receive an invitation email. Instead, you can send them an announcement email that, instead of letting them know they’ve been invited to a board, lets them know that they’ve already been added to a board. On the Invite Form tab of your invitation flow, toggle on “Send different emails to existing users” and then look for the new “Announcement” email template. This email will get sent as soon as you notify Vortex that the invitation has been accepted.
In-product invitation acceptance
In cases where internal invitations aren’t auto-accepted you may want to provide an in-product acceptance experience, where users can see and accept/decline open invitations.Check for open invitations
Send a GET request to
/invitations with targetType being “email” and targetValue being the email address of the given user.Present invitations to the user
Provide a UX for the user to select one or more invitations to accept.
Mark the invitation(s) as accepted
Send a POST request to
/invitations/accept with the IDs of the selected invitations.Adding invitees as users
In some services, an invitee has no relevance until they accept their invitation. But in others, an invitee may largely be treated much like a registered user even in advance of them actually accepting their invitation. For example, when someone is invited to a Slack workspace, they can be added to channels and can receive email notifications. Services like Slack typically accomplish this by adding invitees to a “users” table as soon as they’re invited, rather than having them exclusively tracked in a separate “invitations” table. When using Vortex, where your invitations are tracked by us, you would accomplish this by leveraging a webhook to get notified when new invitations are created. To create a webhook, look for Integrations in the Vortex sidebar and then click on the Webhooks tab. Be sure to select the “Invitation Created” event (at a minimum). If your service leverages invitations to existing users (as outlined in the section above), you may want to exclude those invitations (by filtering on invitation type) as those invitations already represent users.Autojoin administration
As mentioned in the overview of Autojoin, you’ll want to provide an interface for admins in your customer organizations to manage their list of allowed domains. They should be able to add or remove domains as needed. Below is one example of how this might be implemented.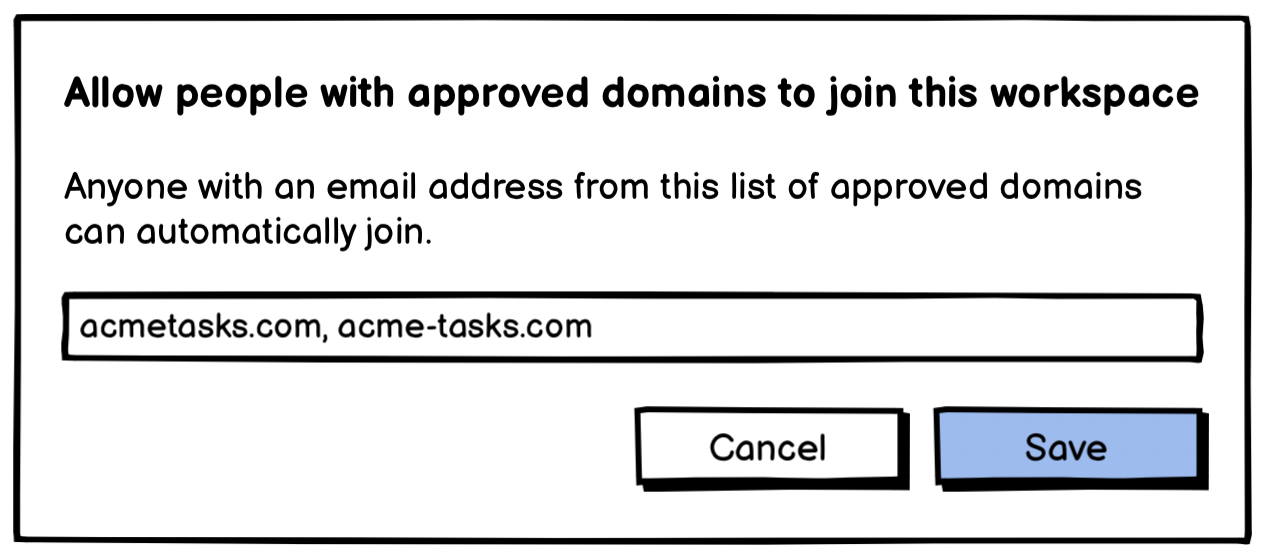
/api/v1/invitations/autojoin endpoint (or use the corresponding method in one of our SDKs) to send the updated list of domains to Vortex. Note that this call will fail with a 400 response if any of the domains are webmail.