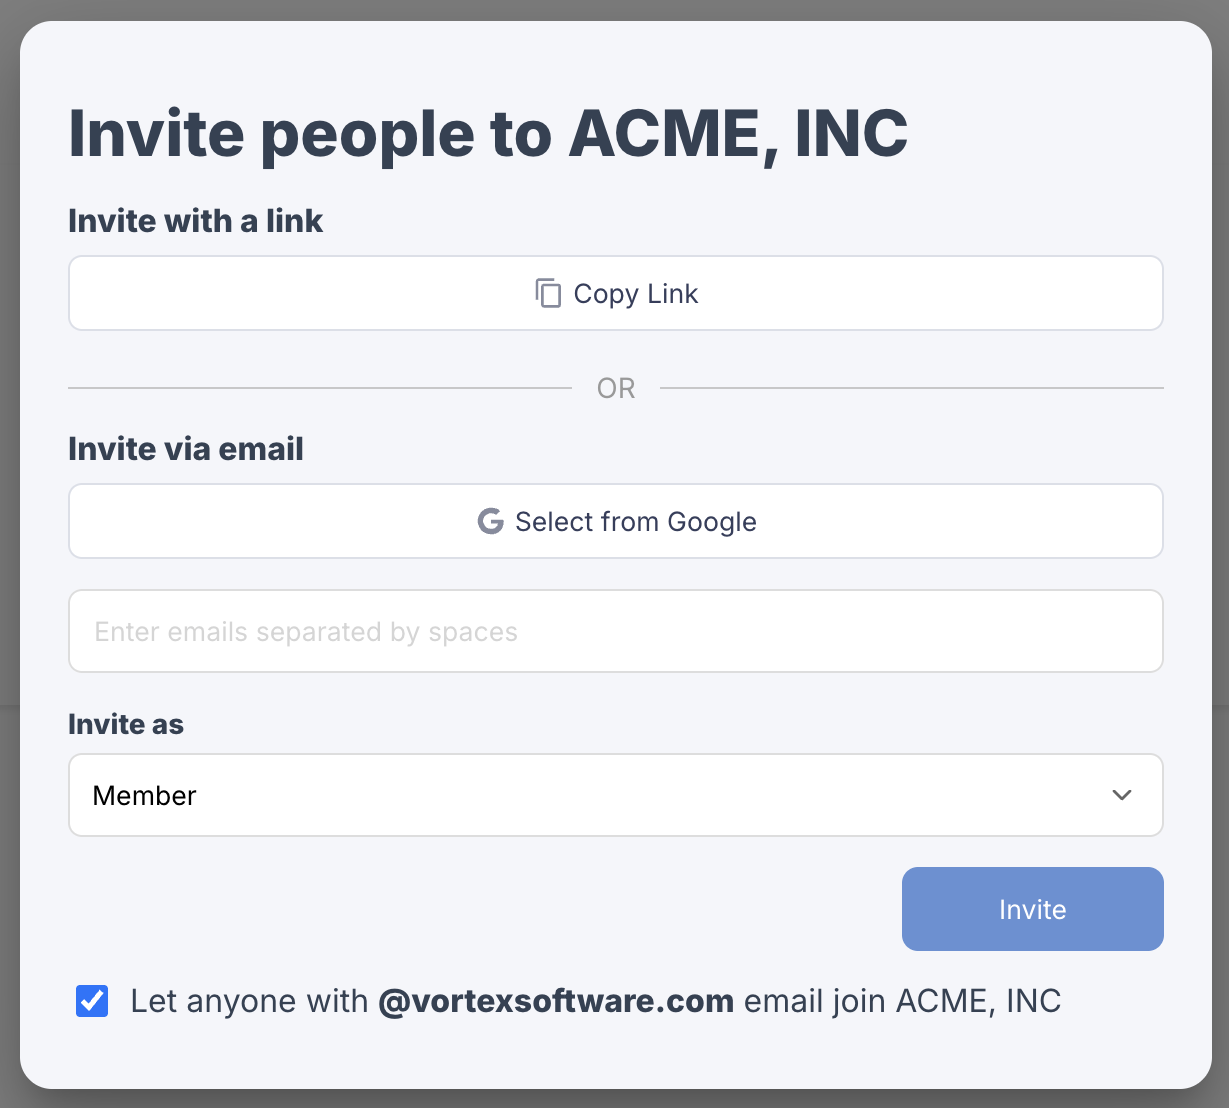
Email Invitations
Email invitations are single-use invitations where your users enter or select the email addresses of the people they want to invite, and your service sends the invitation emails. Of course, in this case, Vortex will be delivering them on your behalf. Email invitations are ubiquitous, being used by the majority of both B2B and B2C services. A key benefit of email invitations is that they allow for an ongoing campaign of interaction with the invitee, which creates more opportunity to convert that invitee into a registered user. You’ll define this campaign when you create your email templatesContact Imports
Contact imports are a form of email invitations. Instead of manually entering email addresses, your users have the convenience of being able to select people to invite from their contacts. There are two sources of contacts that you can enable individually for your users.Google contacts
Users can select from their list of contacts on Google. When enabled, there are additional options to include people from the user’s Google Workspace directory as well as guests from recent Google Calendar events. These options are great options for B2B services. The Calendar option in particular is a good fallback for when a given user’s Google Workspace doesn’t have contact sharing enabled. If your invitation flow includes the Google contact import, you’ll need to create an application in the Google Cloud Console.Create a Google application
Create a Google application
Create a Google Cloud Project
- Visit the Google Cloud Console.
- Click Select a project at the top, then choose New Project.
- Enter a Project name (e.g., Vortex Integration) and click Create.
Enable Google People API
- Navigate to APIs & Services > Library.
- Search for Google People API.
- Click Enable.
Configure OAuth Consent Screen
- Go to APIs & Services > OAuth consent screen.
- Select External and click Create.
- Fill out the App name (e.g., Vortex Integration) and Support email.
- Under Scopes, add https://www.googleapis.com/auth/contacts.readonly.
- Provide any additional required information and click Save and Continue.
Create OAuth Client ID
- Go to APIs & Services > Credentials.
- Click Create Credentials > OAuth Client ID.
- For web applications, select Web application.
- Name your client (e.g., Vortex Web Client).
- Under Authorized JavaScript Origins, add your application’s exact URL (e.g., https://dev.example.com:3000).
- For mobile applications, select iOS for iOS or Web application for Android
- Name your client (e.g., Vortex iOS Client).
- Enter your application’s Bundle ID, App Store ID and Team ID.
- Click Create and note your Client ID.
Create and Restrict API Key
- On the Credentials page, click Create Credentials > API Key.
- After creation, click Restrict Key.
- Under API restrictions, choose Google People API.
- Under Application restrictions, optionally select HTTP referrers and add your application’s URL.
- Click Save and note the generated API Key.
Native address books
Users can select from the list of contacts in the native address books on their iOS and Android devices.Email Domain Verification
When setting up the emails that will be part of your invitation flow you’ll specify a “From” address for each one. This address would ideally be on your own domain, although regardless of what email address you specify here, emails are setting from Vortex’sjyn.us domain until you verify your email domain. See the Email Domains link in the Vortex sidebar.
Shareable Links
Shareable links are invitations that your users distribute on their own. They can do this by copying the link and pasting it themselves into an email, text message, Slack channel, WhatsApp chat, etc. Vortex also allows you to offer built-in sharing options that simplify the distribution of shareable links. These include integrations with various messaging/social services, such as SMS, WhatsApp, and X, as well as options for the operating system’s native share sheet and QR code. For example, if you offered the WhatsApp integration on your invitation form, when a user clicked on it they would be taken directly into the new-message experience on WhatsApp, and the message would be prefilled with default copy that includes the invitation link. Shareable links are multi-use, meaning that a single invitation link can be used by multiple people to join your service. For a B2B service, as an example, one user might copy a shareable link and paste it into a channel in their Slack workspace, making it incredibly easy for them to invite their teammates all at once. Each of your users has their own unique shareable link, which they can deactivate or regenerate at any time.Autojoin
Autojoin allows users to join based on the domain of their email address. For example, AcmeTasks may allow anyone to join their organization on your service by signing up with an @acmetasks.com email address. Autojoin is an excellent option for B2B services, where all users in an organization are typically on a shared email domain. Instead of having to manually enter or select email addresses, a user could simply post a message to Slack or Teams and tell everyone to just sign up using their work email address. Having customers opt in to autojoin when the first person from a given company signs up (i.e., the proverbial user #1) can lead to faster growth and deeper engagement for that organization. The invitation form that you show to users during an onboarding flow should only include the autojoin checkbox if the user is an admin, which is typically the case for user #1. You control this by including theautojoin scope in the adminScopes parameter of your JWT payload when appropriate. If the current user doesn’t have the autojoin scope, or if their email address is on a webmail domain (e.g., gmail.com), the autojoin checkbox will not be displayed for them.
autojoin scope. This effectively makes it an easy way for admins to turn autojoin on or off.
That said, you don’t even need to include the autojoin checkbox on any of your invitation forms to allow your customers to leverage autojoin. Regardless of whether or not you include it on an invitation form, you’ll also want to provide an interface for admins in your customer organizations to manage their list of allowed domains (see details in Autojoin administration). It’s perfectly acceptable for this interface to be the sole place where you’re customers enable autojoin (i.e., by adding domains).